Part 02: IAM
Objectives
- [Understand the fundamentals of AWS IAM and its components]
- Learn how to manage users, groups, roles, and permissions securely
- Implement best practices for access control and identity federation
- Configure permissions for services like EC2.
📚 AWS IAM (Identity and Access Management)
AWS IAM is a web service that helps you securely control access to AWS services and resources for your users.
✅ What is AWS IAM?
AWS Identity and Access Management (IAM) enables you to:
- Manage users and their permissions to access AWS resources.
- Grant fine-grained access using policies.
- Enhance security by applying best practices like least privilege and multi-factor authentication (MFA).
- Control authentication and authorization across accounts and services.
✅ Key Components of IAM
1. Users
- Represents individual people or services accessing AWS.
- Each user can have their own credentials (password, access keys).
2. Groups
- A collection of IAM users.
- Apply permissions collectively rather than individually.
3. Roles
- Assign permissions to AWS resources without creating long-term credentials.
- Used by applications, services, or federated users.
4. Policies
- JSON documents that define permissions.
- Specify allowed or denied actions, resources, and conditions.
✅ IAM Policies
Example of a simple policy:
{
    "Version": "2012-10-17",
    "Statement": [
        {
            "Effect": "Allow",
            "Action": "s3:ListBucket",
            "Resource": "arn:aws:s3:::example-bucket"
        }
    ]
}
Managing IAM Resources
✅ Adding a User
- Navigate to the IAM console
- Click “Users” → “Add user”
- Enter username, select access type (programmatic or console)
- Attach existing policies or create custom ones
- Add user to groups if needed
- Review and create
✅ Adding a Group
- Navigate to the IAM console
- Click “Groups” → “Create group”
- Enter group name
- Attach policies (managed or custom)
- Add users to the group
- Review and create
✅ Attaching Policies to Users or Groups
- Use AWS Managed Policies or create Customer Managed Policies
- Assign permissions based on roles or business requirements
- Example: Attach
AmazonEC2FullAccessto developers managing instances
✅ Creating and Using Roles
- Navigate to “Roles” → “Create role”
- Select trusted entity type (AWS service, another account, or web identity)
- Attach permissions policies
- Review and create
- Assign role to EC2, Lambda, or external service
✅ Test by Attaching the Role to an EC2 Instance
- Navigate to EC2 → Instances → Launch Instance
- Configure the instance by selecting an AMI and instance type
- In Configure Instance Details, under IAM role, select the role you created
- Complete the rest of the instance setup and launch it
- Connect to the instance using SSH and verify the role is attached by running:
  curl http://169.254.169.254/latest/meta-data/iam/info
  or
  aws s3 ls
✅ AWS IAM – Assume Role
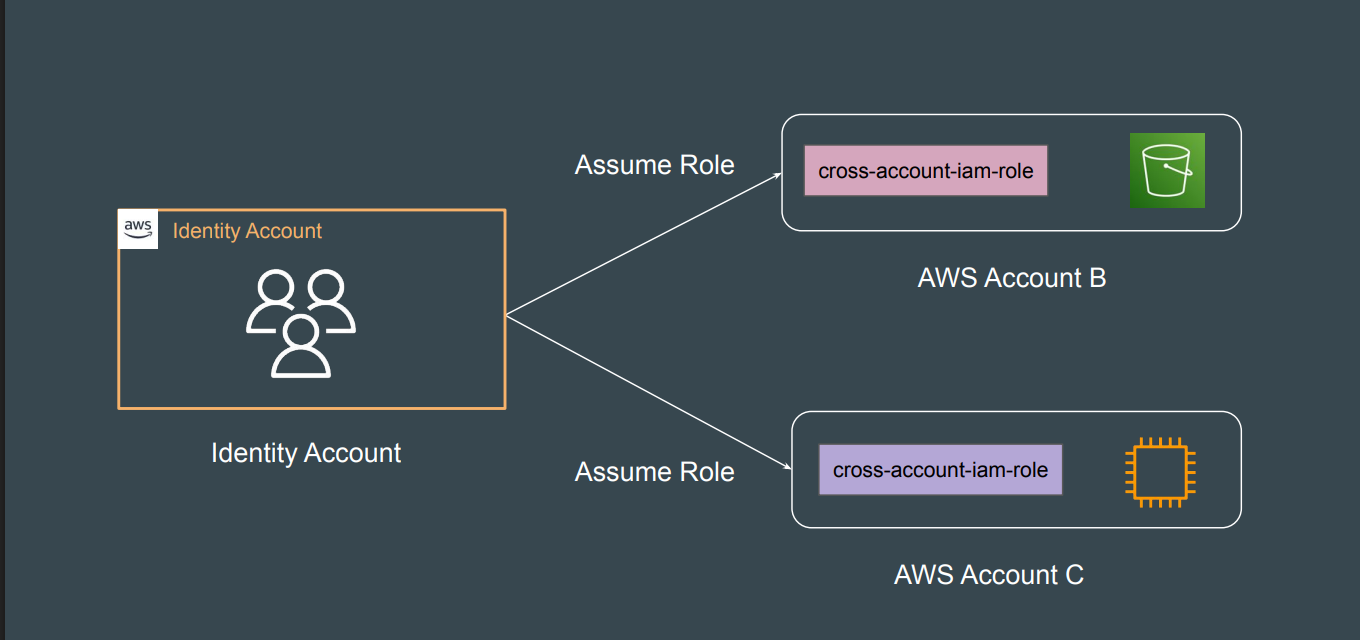
📌 What is Assume Role?
Assume Role is an AWS feature that allows a user, application, or service to temporarily acquire permissions defined by a role without needing permanent credentials.
This is useful for:
✔ Granting limited-time access to resources
✔ Cross-account access
✔ Secure access for applications running on AWS
✔ Federation with external identities
✅ Key Concepts
✅ Role
- An IAM entity with permissions attached.
- Does not have its own long-term credentials like users.
✅ Assume Role
- A process where an entity temporarily takes on the permissions of a role.
- Uses AWS Security Token Service (STS) to request temporary credentials.
✅ Trust Policy
- Defines which entities are allowed to assume the role.
✅ Session
- A temporary environment where permissions are valid.
- Credentials expire after a set time.
✅ How Assume Role Works
- An entity (user, service, application) requests to assume a role.
- AWS verifies the request based on the trust policy.
- AWS issues temporary security credentials (access key, secret key, and session token).
- The entity uses these credentials to access AWS resources.
✅ Example Trust Policy
This policy allows the user Alice to assume the role:
{
  "Version": "2012-10-17",
  "Statement": [
    {
      "Effect": "Allow",
      "Principal": {
        "AWS": "arn:aws:iam::123456789012:user/Alice"
      },
      "Action": "sts:AssumeRole"
    }
  ]
}
Labs:
✅ Creating and Using Roles
- Navigate IAM → Roles → Create Role
- Select trusted entity type: AWS service, another account, or web identity
- Attach permissions policies based on role requirements
- Review and create the role
- Assign role to EC2, Lambda, or external service
✅ Assuming a Role
- Use temporary credentials via STS to assume a role
- Example CLI command:
aws sts assume-role \
    --role-arn "arn:aws:iam::<account-id>:role/<role-name>" \
    --role-session-name "SessionName"
✅ Testing an Assumed Role from AWS Console
Sign in to the AWS Management Console using your IAM user credentials.
Switch Role:
- Click on your username (top-right corner) → Switch Role
- Enter the Account ID and Role Name of the role you want to assume
- Optionally, add a Display Name and Color for easier identification
- Click Switch Role
Verify Role Permissions:
- Once switched, you’ll see the new role’s name in the console header
- Try accessing resources allowed by the role (e.g., list S3 buckets, launch EC2)
- If actions succeed, the role is working correctly
- If you see “Access Denied,” the role’s permissions or trust policy may need adjustment
Switch Back:
- Click on the role name (top-right) → Back to your original user
Legacy Approach: Single AWS Account
Before multi-account strategies became popular, many organizations used a single AWS account for all workloads, environments, and teams.
Challenges of the Legacy Approach:
- Security risks: Lack of isolation increases blast radius if credentials are compromised.
- Billing confusion: Difficult to track costs per project, environment, or team.
- Resource limits: AWS service quotas apply per account, limiting scalability.
- Complex permissions: Managing IAM policies for diverse teams and environments becomes complicated.
- Operational risks: Accidental resource changes can impact production workloads.
AWS Multi-Account Strategy
Managing multiple AWS accounts is a best practice for organizations looking to improve security, billing, and resource isolation. The AWS Multi-Account Strategy helps you organize your cloud environment efficiently.
Why Use Multiple AWS Accounts?
- Isolation of workloads: Separate development, testing, and production environments.
- Security boundaries: Limit blast radius if one account is compromised.
- Billing clarity: Track costs by team, project, or environment.
- Simplified compliance: Enforce policies and audits more easily.
- Resource limits: Avoid hitting AWS service limits by distributing resources across accounts.
Key Components of a Multi-Account Strategy
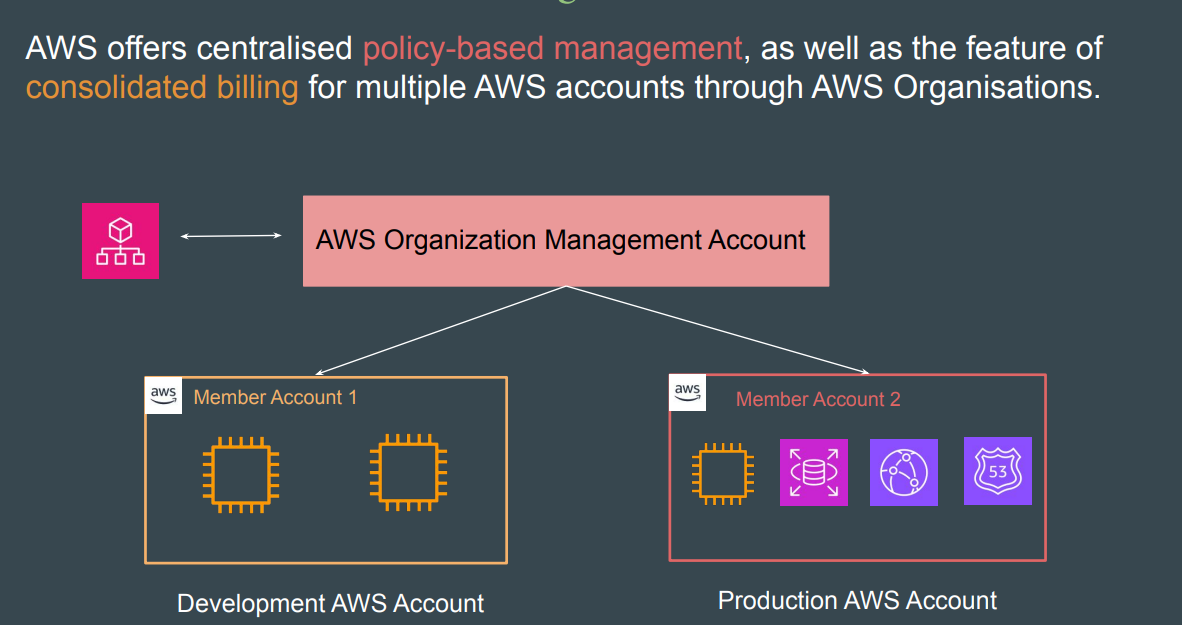
AWS Organizations
- Centralized management of multiple AWS accounts.
- Use Service Control Policies (SCPs) to set permission guardrails.
- Consolidated billing for all linked accounts.
- Automated account creation and lifecycle management.
Account Structure Models
1. Environment-Based
| Account Name | Purpose |
|---|---|
| Prod | Production workloads |
| Dev | Development environment |
| Test | Testing and QA |
2. Business Unit-Based
| Account Name | Purpose |
|---|---|
| Marketing | Marketing projects |
| Finance | Financial systems |
| Engineering | Engineering projects |
3. Application-Based
| Account Name | Purpose |
|---|---|
| App-A | Application A workloads |
| App-B | Application B workloads |
Best Practices
- Centralize logging and monitoring: Use AWS CloudTrail and AWS Config aggregated in a dedicated account.
- Use cross-account roles: Enable secure access between accounts.
- Automate account provisioning: Use AWS Control Tower or custom automation.
- Implement guardrails: Apply SCPs to enforce security policies.
- Tag consistently: Use tags for cost allocation and resource management.
Visual Overview
AWS Organizations
│
├── Security Account (centralized logging, monitoring)
├── Shared Services Account (DNS, directory services)
├── Prod Account(s)
├── Dev Account(s)
└── Test Account(s)
Key Points to Remember: AWS Multi-Account Architectures
For multi-AWS account architectures, you must be familiar with cross-account AWS service-specific configurations and services that enable organizations to maintain centralized access.
| Services / Configurations | Descriptions |
|---|---|
| AWS Organizations | Centralized account management, policy enforcement, consolidated billing |
| IAM Identity Center | Centralized user authentication and access management |
| AWS Security Hub | Centralized security posture management |
| Cross-Account Configurations | CloudTrail, Config, GuardDuty, CloudWatch |
These services and configurations help enforce security, manage access, and centralize monitoring across multiple AWS accounts.
✅ AWS Organizations
📌 What is AWS Organizations?
AWS Organizations is a service that helps you centrally manage and govern multiple AWS accounts.
It allows you to group accounts, apply policies, and simplify billing across your organization.
Key benefits:
- Centralized management of multiple AWS accounts
- Apply Service Control Policies (SCPs) for governance
- Consolidated billing and cost tracking
- Simplified account creation and organization
✅ Key Concepts
1. Organization
- The top-level entity that contains all your AWS accounts and OUs.
2. Accounts
- Individual AWS accounts within your organization.
- Can be master/management account or member accounts.
3. Organizational Units (OUs)
- Logical grouping of accounts within the organization.
- SCPs can be applied at the OU level for consistent governance.
4. Service Control Policies (SCPs)
- Policies that define what actions accounts in your organization can or cannot perform.
- SCPs restrict permissions, but do not grant them.
5. Master / Management Account
- The account that creates the organization and manages billing, OUs, and policies.
✅ Features
- Account Management: Create, invite, and manage accounts from a single place.
- Centralized Billing: Consolidate billing for all accounts into a single payment method.
- Policy-Based Management: Apply SCPs to OUs and accounts to enforce governance.
- Automation: Use AWS Control Tower or CLI for managing multiple accounts.
✅ Steps to Create an AWS Organization
Step 1: Sign in as the Master Account
- Use the root account or IAM user with admin privileges.
Step 2: Create the Organization
- Go to AWS Organizations console → C
✅ AWS SCP (Service Control Policies)
📌 What is SCP?
Service Control Policies (SCPs) are a feature of AWS Organizations that allow you to control what services and actions accounts in your organization can access.
SCPs do not grant permissions; they only restrict or allow actions for accounts under an Organizational Unit (OU).
✅ Key Concepts
- Root: Top-level container in an AWS Organization. SCPs attached here apply to all accounts.
- Organizational Unit (OU): A container for accounts. SCPs attached to an OU apply to all member accounts.
- Policy types:
- Allow list: Only actions listed are allowed.
- Deny list: Actions listed are explicitly denied.
- Effect:
AlloworDeny. Deny overrides any Allow permission from IAM policies.
✅ Steps to Create and Attach SCP
Step 1: Enable AWS Organizations
- Login as root user or account with permissions.
- Go to AWS Organizations console.
- Create an organization if not already done.
Step 2: Create a Service Control Policy
- Go to Policies → Create policy.
- Choose JSON or Visual editor.
- Example JSON for denying S3 deletion:
{
  "Version": "2012-10-17",
  "Statement": [
    {
      "Effect": "Deny",
      "Action": "s3:DeleteBucket",
      "Resource": "*"
    }
  ]
}
✅ AWS Organizations and SCP (Service Control Policies)
- AWS Organizations helps you centrally manage multiple AWS accounts
- SCPs are used to set permission guardrails across accounts in the organization
- SCPs do not grant permissions, they limit permissions that IAM roles or users can have
✅ Using SCPs
- Navigate AWS Organizations → Policies → Create Policy
- Define allowed or denied actions using JSON, e.g.:
{
  "Version": "2012-10-17",
  "Statement": [
    {
      "Effect": "Deny",
      "Action": "s3:DeleteBucket",
      "Resource": "*"
    }
  ]
}- Tag Policies
Assignmnets:
✅ 10 Tasks Related to AWS IAM Users
These tasks are commonly performed when managing IAM Users in AWS.
1. Create a new IAM user
- Add a user with a name and specify programmatic or console access.
2. Assign permissions to a user
- Attach managed or inline policies to grant necessary permissions.
3. Add a user to a group
- Place users into groups to inherit shared permissions.
4. Enable Multi-Factor Authentication (MFA)
- Secure the user’s AWS account by enabling MFA.
5. Generate access keys for the user
- Create programmatic access credentials for CLI or SDK use.
6. Rotate the user’s access keys
- Replace old keys with new ones to enhance security.
7. Set password policies
- Enforce password length, complexity, and expiration rules for users.
8. Attach policies using least privilege principle
- Grant only required permissions rather than full access.
9. Monitor user activity
- Use AWS CloudTrail or IAM Access Analyzer to review actions performed by users.
10. Remove unused or inactive users
- Identify and delete users that are no longer required or inactive.
AWS Identity Center
Objective
- Understand what AWS Identity Center is.
- Learn how to configure and use it for secure workforce access.
- Explore its integration with AWS Organizations, IAM, and external identity providers.
What is AWS Identity Center?
AWS Identity Center is a centralized service that enables you to manage user identities and permissions across multiple AWS accounts and applications. It simplifies single sign-on (SSO) access to AWS Management Console, CLI, and supported third-party SaaS apps.
It replaces the older AWS SSO service and integrates deeply with AWS Organizations.
Key Features
- 🔐 Centralized identity and access management for AWS and applications
- ✅ SSO access to AWS accounts and roles
- 🌐 Integration with identity providers (Microsoft AD, Okta, Azure AD, etc.)
- 📁 Directory options: AWS Managed Directory, AD Connector, or External IdP
- 📜 Assign fine-grained permissions via permission sets
- 🔄 Automatically sync users/groups from external IdPs
How It Works
- Create users and groups in AWS Identity Center or sync from an identity provider.
- Assign users/groups to AWS accounts and roles via permission sets.
- Users log in through a custom portal URL (e.g.,
https://d-abc123.awsapps.com/start). - Users gain SSO access to AWS services, CLI, or external applications.
Directory Options
- AWS Identity Center Directory (default): Manage users directly in AWS.
- AWS Managed Microsoft AD: Connect to your self-managed Active Directory.
- AD Connector: Proxy to your on-premises AD.
- External Identity Provider: Integrate via SAML 2.0 (Okta, Azure AD, etc.)
Use Cases
- Centralized user access across 100s of AWS accounts
- Enabling secure workforce SSO with minimal friction
- Simplifying permission management for non-technical teams
- Integrating corporate identity systems with AWS
Steps to Set Up
- Enable AWS Identity Center in the AWS console.
- Choose or connect a directory source.
- Add or sync users and groups.
- Create and assign permission sets (based on IAM policies).
- Assign users/groups to AWS accounts.
- Share the SSO login portal URL with users.
CLI Access with Identity Center
You can configure CLI access using:
aws configure ssoBenefits Over IAM-Only Setup
| IAM Roles/Users | AWS Identity Center |
|---|---|
| Manual per-user setup | Centralized and scalable |
| Hard to manage at scale | Supports user/group mapping |
| Password-based access | SSO + MFA support |
| No user sync | Sync with corporate IdPs |